Dill, with its delicate fern-like leaves and distinctive flavor, is a versatile herb that adds a burst of freshness to a variety of dishes. Growing your own dill from store-bought seeds is a rewarding and straightforward process that allows you to enjoy this aromatic herb straight from your garden to your plate. In this comprehensive guide, we will take you through the step-by-step process of cultivating dill from store-bought seeds, ensuring a bountiful harvest and a constant supply for your culinary adventures.
Choosing the Right Seeds:
Before embarking on your dill-growing journey, it’s crucial to start with quality seeds. When selecting dill seeds at your local store or garden center, opt for organic or untreated varieties whenever possible. This ensures that your plants will be free from harmful chemicals and have the best chance of thriving. Additionally, check the expiration date on the seed packet to ensure freshness.
Materials and Equipment:
To successfully grow dill from store-bought seeds, gather the necessary materials and equipment:
- Dill seeds
- Potting soil or well-draining garden soil
- Pots or containers with drainage holes
- Watering can or hose
- Gardening gloves
- Fertilizer (preferably organic)
- Garden trowel or hand shovel
- Mulch (optional)
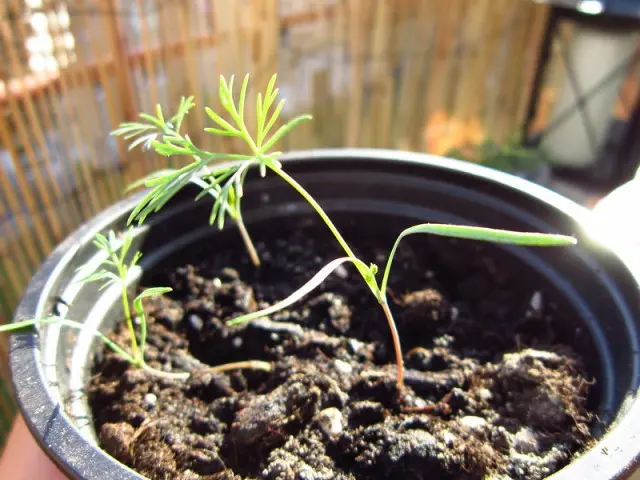
Step 1: Germinating the Seeds
Start by germinating the dill seeds indoors, especially if you’re growing them during the colder months. Fill small pots or seed trays with moistened potting soil, leaving about half an inch from the top. Sprinkle the dill seeds evenly on the surface, pressing them gently into the soil. Lightly cover the seeds with a thin layer of soil and mist the surface with water.
Place the pots in a warm and sunny location, and keep the soil consistently moist. Dill seeds typically germinate within 7-14 days. Once the seedlings have reached a height of about 2 inches and have developed a couple of true leaves, they are ready to be transplanted.
Step 2: Transplanting Seedlings
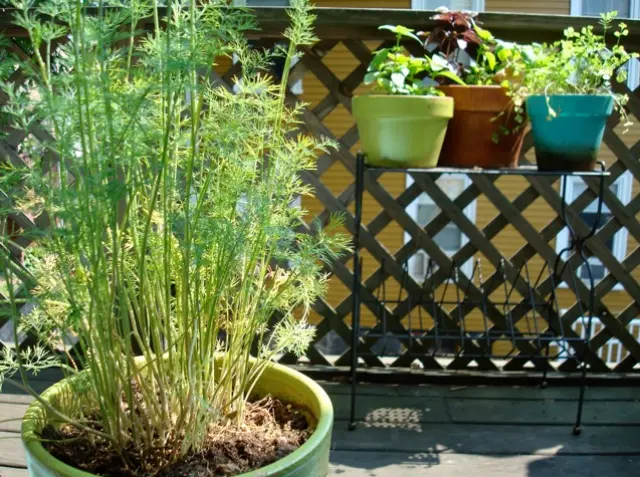
Carefully transplant the dill seedlings into larger pots or directly into your garden. Choose a sunny location with well-draining soil for optimal growth. Space the seedlings about 12 to 18 inches apart, as dill plants can reach a height of 2 to 3 feet.
Gently remove the seedlings from their pots, taking care not to disturb the roots. Dig a hole in the soil, place the seedling in the hole, and cover the roots with soil. Water the newly transplanted seedlings thoroughly.
Step 3: Outdoor Care
Dill thrives in full sunlight, so choose a location in your garden that receives at least 6-8 hours of sunlight per day. Water the plants consistently, keeping the soil evenly moist but not waterlogged. Dill prefers well-draining soil, so be mindful of overwatering.
Consider applying a balanced, organic fertilizer every 4-6 weeks to promote healthy growth. Follow the instructions on the fertilizer package and avoid over-fertilizing, as this can lead to excessive foliage growth at the expense of flavor.
Step 4: Companion Planting
Dill is known to be a beneficial companion plant for certain vegetables, including tomatoes and cucumbers. Planting dill near these crops can help repel pests like aphids and attract beneficial insects such as ladybugs and parasitic wasps. Be strategic in your garden layout to take advantage of these companion planting benefits.
Step 5: Harvesting
The beauty of growing dill is that you can start harvesting the leaves once the plants reach about 8 inches in height. Use clean, sharp scissors or pruning shears to snip the leaves, starting from the top of the plant. Regular harvesting encourages bushier growth and prolongs the overall harvest period.
For dill seeds, allow the flower heads to fully mature and turn brown before harvesting. Cut the flower heads and place them in a paper bag. Shake the bag gently to release the seeds, which can then be stored in a cool, dry place for future use.
Step 6: Storing and Preserving
Fresh dill can be stored in the refrigerator for up to two weeks. To prolong its shelf life, wrap the dill in a damp paper towel and place it in a plastic bag.
For long-term preservation, consider drying or freezing dill. To dry dill, hang bunches of the herb in a cool, dark place until the leaves are thoroughly dry. Once dry, store the leaves in an airtight container. Alternatively, chop the fresh leaves and freeze them in ice cube trays with water or oil for easy use in cooking.
Conclusion:
Growing dill from store-bought seeds is a satisfying and accessible endeavor, allowing you to savor the fresh, aromatic flavors of this herb in your culinary creations. By following these step-by-step instructions, you’ll be cultivating a bountiful dill harvest in no time, enhancing your garden and your kitchen with the vibrant essence of this versatile herb. Happy growing!
MORE POSTS: