
I never thought I’d turn a $2 ginger root from the grocery store into a thriving potted plant — but here I am, harvesting fresh ginger from my own patio every season. If you’ve ever looked at ginger on a supermarket shelf and wondered whether you could just… grow that, the answer is yes. With a little preparation and the right setup, store-bought ginger in pots is one of the most satisfying beginner gardening projects you can start today.
This guide walks you through every step: picking the right piece, preparing it properly, planting it, and finally harvesting more ginger than you bought in the first place.
Why Growing Ginger in Pots Actually Works
Ginger (Zingiber officinale) is a tropical perennial from Southeast Asia, and it has one quality that makes it ideal for container growing: it spreads horizontally, not vertically. That means you don’t need a deep garden bed or a lot of space. A wide, shallow pot on a balcony, patio, or sunny windowsill is genuinely all it takes.
Growing in pots also gives you control that an in-ground bed doesn’t — you can move the plant indoors when temperatures drop, manage moisture more precisely, and protect it from direct afternoon sun that would otherwise stress it. For gardeners in cooler climates especially, pots are the reason ginger is even possible.
Choosing the Right Store-Bought Ginger
Not every piece of ginger from the grocery store will sprout reliably — and this is where most beginners hit their first stumbling block. Here’s what to look for:
- Go organic whenever possible. Conventional ginger is frequently treated with growth inhibitors to prevent sprouting on store shelves. Organic ginger skips that treatment, which means it’s far more likely to wake up and grow.
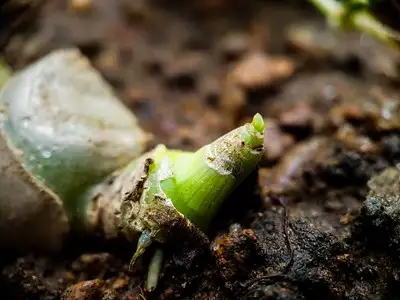
- Look for “eyes” or buds. These are the small, slightly raised nubs — sometimes greenish or pinkish — on the surface of the rhizome. Each eye is a potential shoot. The more eyes, the better.
- Pick firm, plump pieces. Avoid anything wrinkled, dried out, or showing signs of mold. A heavy, fresh-feeling piece has the stored energy to push new growth.
- Bigger sections sprout more reliably. Pieces at least 2 inches across tend to outperform small scraps, which can dry out or rot before they get going.
If you can only find conventional (non-organic) ginger, don’t give up — the soaking step below helps overcome growth inhibitors effectively.
READ MORE: How to grow asparagus from store bought asparagus
Step 1: Soak the Ginger to Kickstart Sprouting
Before you plant anything, give your ginger rhizome a good overnight soak. Place it in a bowl of warm (not hot) water for 12–24 hours. This does two things: it washes away any residual growth inhibitor coating that may have been applied commercially, and it rehydrates the rhizome so it has the moisture it needs to start pushing out new growth.
Some growers swear by setting the ginger on a sunny windowsill for a week or two before soaking — the light exposure can help stimulate bud formation, especially on pieces that don’t yet show obvious eyes. Either way, discard the soaking water when you’re done.
Step 2: Cut and Callous (Optional but Helpful)
If you have a large rhizome and want to plant multiple pieces, cut it into sections — aim for at least 1–2 inches per piece with one or two eyes on each. Then let the cut surfaces air-dry for a couple of hours before planting. This forms a small callous over the cut, which dramatically reduces the chance of rot once the piece is in moist soil.
Skipping the callous step is one of the most common reasons ginger fails early on. The raw cut surface is vulnerable in wet potting mix — give it a few hours and you’ll be giving that piece a real head start.
Step 3: Choosing the Right Pot
Container selection matters more with ginger than with almost any other potted herb. Because rhizomes grow sideways and multiply as they spread, the pot you choose determines how much ginger you’ll eventually harvest.
| Container Type | Minimum Size | Best For | Pros / Cons |
|---|---|---|---|
| Wide plastic pot | 12–14 inches wide, 8–10 inches deep | Single rhizome, beginners | Retains moisture well; can get waterlogged if drainage is poor |
| Terracotta pot | 12–14 inches wide, 8–10 inches deep | Humid climates | Breathable walls prevent soggy soil; dries out faster in heat |
| Fabric grow bag | 10–15 gallons | Maximizing harvest | Excellent drainage and air pruning of roots; needs more frequent watering |
| Shallow bonsai tray | 16–18 inches wide | Indoor growing | Maximum horizontal spread for biggest indoor harvests; must have drainage |
Whatever container you choose, drainage holes are non-negotiable. Waterlogged soil is the single biggest killer of potted ginger. Elevating the pot slightly on pot feet or bricks ensures water can escape freely.
Step 4: Getting the Soil Mix Right
Ginger in its native forest understory grows in open, spongy, leaf-litter-rich soil that’s moist but never sitting in water. You want to recreate that in a pot. A good starting mix is:
- 50% quality potting soil — your base layer of nutrition and structure
- 30% compost or aged manure — feeds the rhizomes over the long growing season
- 20% perlite or composted bark chips — keeps the mix loose and well-draining so roots never sit in water
Avoid using straight garden soil in pots — it compacts quickly and restricts the horizontal spread that ginger needs. If you want to keep things simple, a good bagged potting mix amended with a few handfuls of compost and perlite works perfectly well.
Step 5: Planting the Rhizome
This step is simpler than most people expect — and easier to overthink. Here’s the key principle: plant shallow, eyes up.
Fill your container almost to the top with your soil mix. Lay the ginger rhizome — or your prepared sections — on the surface with the eyes or buds pointing upward. Cover with just about an inch of potting mix. That’s it. Ginger doesn’t need depth; it needs warmth and surface space to work with.
Planting too deeply is another common mistake that leads to slow sprouting or rot. The rhizomes actually prefer to sit near the surface where they can take in a little light and warmth. Some growers even leave the bud tips just barely peeking through the soil.
Water gently after planting — just enough to moisten the soil without saturating it. Then put the pot somewhere warm.
Step 6: Light, Temperature, and Humidity
Ginger is not a sun-lover the way tomatoes or peppers are. In its native habitat, it grows under a forest canopy — meaning it thrives in bright, indirect light rather than harsh direct sun. Too much direct afternoon sun will cause the leaves to scorch and curl.
Indoors, a bright east- or north-facing windowsill is ideal. Outdoors, a spot with morning sun and afternoon shade is the sweet spot. If you’re in a hot climate, shading during summer afternoons can prevent heat stress that shows up as yellowing leaves.
Temperature is the other big variable. Ginger wants soil temperatures between 70–85°F (21–29°C) to sprout and grow well. Below 65°F (18°C), the rhizomes go dormant and won’t sprout — a common frustration when people plant outdoors too early in spring. A seedling heat mat under the pot solves this problem instantly in cooler climates.
Ginger also appreciates humidity. If you’re growing indoors in a dry home, occasional misting or a pebble tray with water under the pot can help replicate that tropical moisture it prefers.
Step 7: Watering and Feeding
The watering rhythm for potted ginger is: moist, but never soggy. Check the top inch of soil — when it feels dry, water thoroughly until it drains from the bottom. Don’t water again until that top inch dries out again. In summer heat, this might be every 2–3 days; in cooler weather, it could be once a week or less.
Because ginger is a heavy feeder with a long growing season, regular fertilizing makes a noticeable difference in your harvest. For the first three months, use a balanced fertilizer (10-10-10) monthly to support both leaf and root development. As the season progresses and rhizomes are actively forming, switch to a lower-nitrogen, higher-potassium formula to encourage root growth over foliage. Liquid seaweed or compost tea are excellent organic options that work well throughout.
One thing worth knowing: ginger’s high water requirement means nutrients get flushed out of potting mix faster than they would in garden soil. Regular feeding compensates for this and keeps the plant strong all season.
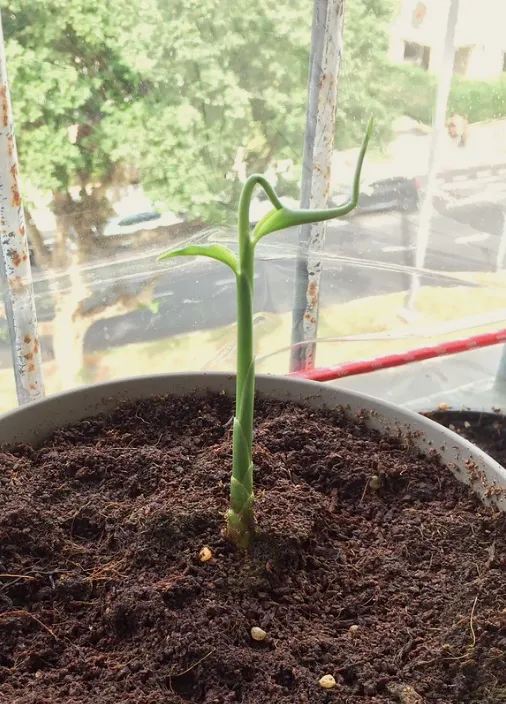
What to Expect: Germination and Growth Timeline
Patience is genuinely required here. Even under ideal conditions, ginger can take 2–8 weeks to show its first shoots above the soil — and sometimes as long as 10 weeks. Don’t dig up the rhizome to check on it (a tempting but usually fatal mistake). As long as the soil is warm and moist, something is happening underground.
| Timeframe | What’s Happening | What to Do |
|---|---|---|
| Week 1–2 | Rhizome settling, roots beginning to form | Keep warm and lightly moist; don’t disturb |
| Week 2–6 | First shoots may emerge; some pieces take longer | Maintain temperature above 65°F; be patient |
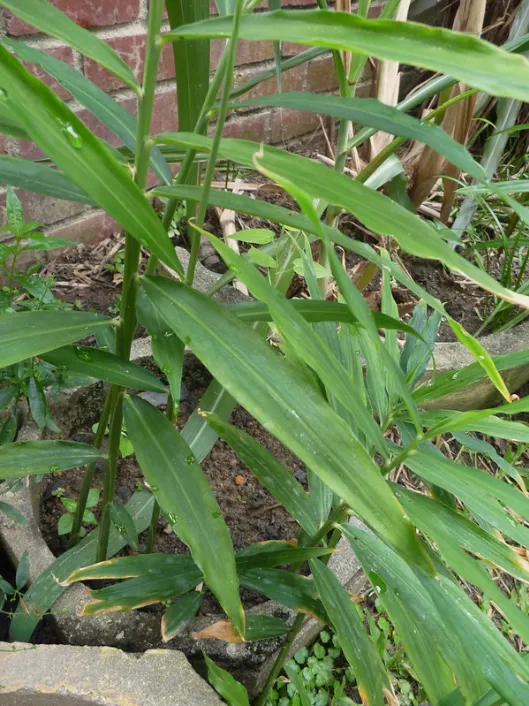
| Month 2–4 | Leafy stalks growing; rhizomes spreading | Begin regular fertilizing; ensure bright indirect light |
| Month 4–6 | Rhizomes actively multiplying; plant filling out | Upsize pot if roots are crowded; continue feeding |
| Month 8–10 | Full maturity; leaves may yellow as plant matures | Time to harvest! |
MORE POSTS: How to grow Horseradish from store-bought roots
Troubleshooting Common Problems
No Sprouts After 6+ Weeks
The most likely culprit is soil temperature. Ginger will not sprout in cold soil — if your pot is sitting in a cool room or outdoors before the soil has warmed, nothing will happen no matter how perfect everything else is. Check with a soil thermometer. Below 65°F, bring the pot somewhere warmer or use a heat mat.
Mushy, Rotting Rhizome
This is overwatering combined with poor drainage. If you catch it early, remove the affected piece, let it dry out, and replant the healthy sections after letting them callous. Going forward, add more perlite to the mix and water only when the top inch is dry.
Yellowing Leaves in Summer
Usually heat stress from too much direct afternoon sun. Move the pot to a position with more shade in the afternoon. Some yellowing of older lower leaves late in the season is also completely normal as the plant matures toward harvest.
Leggy, Sparse Foliage
Not enough light. Ginger needs bright indirect light — a truly dim corner won’t cut it. Move the pot closer to a window or to a brighter outdoor position.
How and When to Harvest
One of the best things about growing ginger in pots is that you don’t have to wait for a full harvest to enjoy it. After a few months of established growth, you can practice what’s called the “banking method” — use your fingers to gently unearth a section of rhizome from around the edge of the pot, snap or cut off a small piece, and cover it back up. The plant keeps growing; you get fresh ginger for your kitchen.
For a full harvest, wait 8–10 months after planting. A reliable signal: the leaves begin to yellow and die back on their own, which tells you the plant is drawing energy back into the rhizomes. At that point, tip the entire pot out, shake off the soil, and you’ll find far more ginger than you started with — often several times over.
Young ginger (harvested at 4–6 months) is thin-skinned, less fibrous, and milder in flavor — great for pickling, teas, or using fresh. Mature ginger is more potent, more aromatic, and what you’ll typically see in stores.
Save a few good-looking rhizomes with eyes to replant for next season. Store the rest in the fridge for weeks, or in the freezer where it stays fresh for months and grates even more easily straight from frozen.
Overwintering Your Ginger Plant
In USDA Zones 9–11, ginger can live outdoors year-round. Everywhere else, you’ll want to bring the pot indoors before the first frost. Ginger goes naturally dormant when temperatures and light levels drop — the leaves die back and the plant essentially rests underground. This is normal, not a sign that something is wrong.
During dormancy, water very sparingly — just enough to keep the rhizomes from completely desiccating. Store the pot in a cool but frost-free location (a basement or garage works well). When spring arrives and temperatures climb again, move it back to a warm spot, resume regular watering, and watch it wake back up. The same plant can give you multiple seasons of harvests this way.
Quick Reference: Growing Ginger in Pots at a Glance
| Factor | What Ginger Needs |
|---|---|
| Pot size | 12–16 inches wide; 8–10 inches deep; wide > deep |
| Soil mix | Potting soil + compost + perlite; loose and well-draining |
| Planting depth | 1 inch below surface, eyes facing up |
| Soil temperature | 70–85°F (21–29°C); will not sprout below 65°F |
| Light | Bright indirect light; avoid harsh afternoon direct sun |
| Watering | Moist but not soggy; water when top inch is dry |
| Fertilizer | Balanced 10-10-10 early; switch to high-K formula mid-season |
| Time to harvest | 8–10 months for full harvest; partial harvest from month 4+ |
| Winter care | Bring indoors before frost; water minimally during dormancy |
Final Thoughts
Growing store-bought ginger in pots is genuinely one of those projects that delivers more than you expect from such a simple starting point. A single grocery store rhizome — the kind you’d normally slice up for a stir-fry and forget about — can become a lush, tropical-looking plant that produces more fresh ginger than you’ll need, season after season.
The learning curve is mostly about two things: choosing organic, picking a wide pot, and trusting the process even when nothing seems to be happening underground. Once you’ve done it once, you’ll understand exactly what ginger needs — and you’ll probably find yourself replanting every spring without a second thought.
Have you tried growing ginger from store-bought roots? Drop your experience in the comments — I’d love to hear what variety you started with and how it’s doing.