
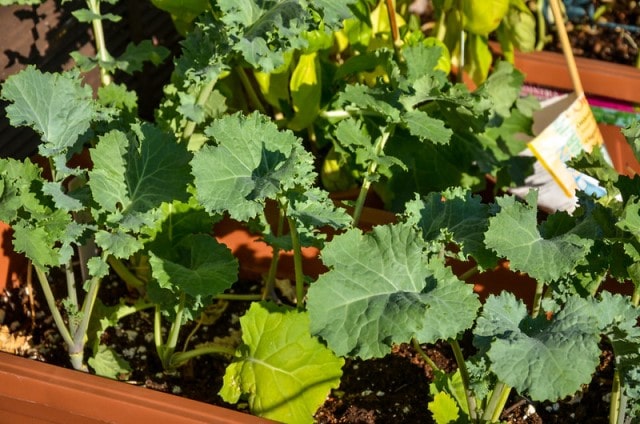
When it comes to growing your own vegetables, kale is a popular choice due to its nutritional value and versatility in cooking. But did you know that you can actually grow kale from store-bought kale? It’s true! By using cuttings from a fresh bunch of kale, you can propagate your own kale plants and have a constant supply of this healthy leafy green. In this section, we will provide an overview of how to grow kale from store-bought kale and the benefits of doing so.
Overview of growing kale from store-bought kale
Growing kale from store-bought kale is a great way to save money and ensure that you have a fresh supply of this nutritious vegetable. Here are the basic steps to get started:
- Choose fresh kale: Look for a bunch of kale that has been freshly picked and is in good condition. The fresher the kale, the higher the chance of success in propagating it.
- Select plantlets or main stem cuttings: From the main stem of the kale, you can either pluck plantlets from the node or take cuttings between the nodes. Both methods can successfully propagate new kale plants.
- Plant the cuttings: Prepare a pot with potting compost and plant the cuttings directly into the compost. Keep the soil moist until new roots start to grow.
- Care for the plants: Water the plants regularly and provide them with proper sunlight. Make sure to follow the correct harvesting procedures to ensure continuous growth and harvest.
By following these simple steps, you can have your own kale plants thriving in no time. It’s a rewarding experience to see your store-bought kale transform into a flourishing garden of fresh greens.
Tips for choosing healthy store-bought kale
Growing kale from store-bought kale is a great way to have a fresh supply of this nutritious vegetable right at home. But before you start planting, it’s important to select the right kale from the store. Here are some tips to help you choose healthy store-bought kale for propagation:
- Choose organic kale: Organic kale is grown without the use of synthetic pesticides and chemicals, making it a healthier choice for planting.
- Look for fresh, vibrant leaves: Select kale bunches with bright green leaves that are crisp and fresh-looking. Avoid kale with yellowing or wilting leaves as they may not propagate successfully.
- Check the stems: The stems of the kale should be moist and firm. Avoid kale with dry or mushy stems, as they may indicate poor quality or spoilage.
- Inspect for pests: Carefully examine the kale leaves for any signs of pests, such as holes or insect activity. Avoid kale that shows signs of pest damage, as it may negatively affect the growth of your propagated plants.
By choosing healthy store-bought kale, you’ll increase the chances of successful propagation and enjoy a bountiful harvest of fresh kale from your own garden.
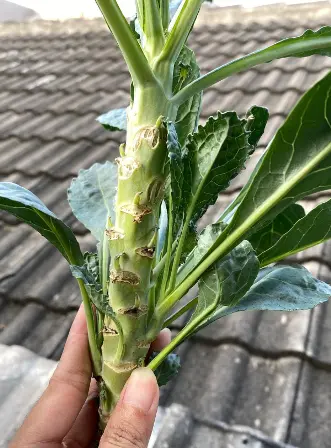
Methods for propagating kale from store-bought kale
Growing kale from store-bought kale is a great way to have a continuous supply of fresh greens in your garden. Here are two methods for propagating kale from store-bought kale:
- Plantlet method: Look for plantlets on the main stem of your store-bought kale. These are small, baby plants that can be plucked from the main stem. Plant the stem directly into potting compost and keep it moist until new roots develop.
- Main stem method: If you have a full branch of mature kale, you can cut it into sections between the nodes. Place these sections in potting media and keep them watered and damp until new roots appear.
Properly cleaning and trimming the cuttings
Before propagating kale from store-bought cuttings, it’s important to properly clean and trim the cuttings to ensure their health. Here’s how:
- Clean the cuttings: Gently rinse the cuttings under cool water to remove any dirt or debris.
- Trim the cuttings: Use sharp, sterilized shears to trim any damaged or wilted leaves. Trim the cuttings just above the nodes for the plantlet method or between the nodes for the main stem method.
- Remove lower leaves: For the main stem method, remove the lower leaves from the cuttings to promote root growth.
By properly preparing the cuttings, you are setting them up for successful propagation and growth. Once the cuttings are prepared, follow the appropriate method for propagating kale and soon you’ll have fresh kale growing in your garden.
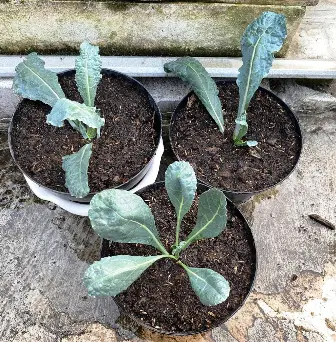
Step-by-step guide to planting kale cuttings
To successfully grow kale from store-bought cuttings, follow these simple steps:
- Prepare the cuttings: Select healthy kale plantlets from your store-bought bunch. Carefully pluck them from the main stem, making sure to include a small portion of the stem. Remove any excess leaves from the bottom of the cuttings.
- Select a container: Choose a pot or container that is at least 6 inches deep and has drainage holes to prevent waterlogging. Make sure the container is large enough to accommodate the number of cuttings you have.
- Prepare the soil: Fill the container with well-draining potting soil or a mixture of compost, peat moss, and perlite. This will provide the necessary nutrients and ensure proper drainage.
- Plant the cuttings: Create small holes in the soil with your finger or a pencil. Insert the bottom end of each cutting into a hole, making sure the leafy portion remains above the soil surface. Gently firm the soil around the cuttings to secure them in place.
- Water and care: Water the cuttings thoroughly after planting to promote root development. Keep the soil consistently moist but not waterlogged. Place the container in a sunny location, preferably receiving 4-6 hours of sunlight per day. Monitor moisture levels regularly and water as needed.
Choosing the right soil and container for optimal growth
To ensure optimal growth and success when growing kale from store-bought cuttings, it is important to choose the right soil and container. Here are some tips to keep in mind:
- Soil: Kale thrives in well-draining soil that is rich in organic matter. Choose a high-quality potting mix that is specifically formulated for vegetables or mix compost, peat moss, and perlite in equal parts to create a nutrient-rich and well-draining medium.
- Container: Select a container that is large enough to accommodate the number of cuttings you have and has drainage holes. A container that is at least 6 inches deep and wide is suitable for growing kale. Consider using a container that is made of a durable material such as plastic or glazed ceramic.
By following these steps and using the right soil and container, you can successfully grow kale from store-bought cuttings and enjoy fresh and nutritious greens from your own garden.
Watering and fertilizing techniques for healthy kale growth
Proper watering and fertilizing are crucial for the healthy growth of kale plants. Here are some tips to ensure your kale plants thrive:
Watering:
– Kale plants require consistent moisture to grow properly. Water them deeply once or twice a week, ensuring the soil is evenly moist.- Avoid overwatering, as it can lead to root rot and other diseases. Check the soil moisture levels before watering.- Mulching around the base of the plants helps retain moisture and prevent weed growth.
Fertilizing:
– Before planting, amend the soil with organic matter, such as compost or well-rotted manure, to provide essential nutrients.- Throughout the growing season, use a balanced fertilizer with equal amounts of nitrogen, phosphorus, and potassium.- Apply the fertilizer according to the manufacturer’s instructions, typically every 4-6 weeks.- Avoid over-fertilizing, as it can cause excessive leaf growth and reduce the flavor of the kale.
Managing pests and diseases
Kale is generally a hardy plant, but it can still be susceptible to pests and diseases. Here are some common issues and how to manage them:
Pests:
– Aphids: Use insecticidal soap or neem oil to control aphid infestations. Introduce beneficial insects, such as ladybugs, to help control aphid populations.- Cabbage worms: Handpick and destroy any cabbage worms you find on your kale plants. Use row covers to prevent adult moths from laying eggs on the plants.- Slugs and snails: Set up traps using beer or copper barriers to deter slugs and snails from damaging your kale.
Diseases:
– Downy mildew: Ensure proper spacing between plants for good air circulation. Remove and destroy any infected plants to prevent the spread of the disease.- Black rot: Practice crop rotation and avoid planting kale in the same location year after year. Dispose of any infected plants and sanitize gardening tools to prevent the spread of the disease.
By following these care guidelines and promptly addressing any pest or disease issues, you can enjoy a bountiful harvest of fresh and healthy kale from your own garden.
Containers need to be at least 10 inches in depth and wide enough so that leaves can grow easily.
Conclusion:
I hope this guide has provided you with the necessary information and steps to successfully grow kale from store-bought kale. Remember, patience and care are key when it comes to gardening. If you have any further questions or would like to share your own experiences, feel free to leave a comment below. Happy growing!
YOU MAY LIKE: